In the previous CAD courses we show you how to reach, access, and allocation the preferable workbenches in CATIA (V5) program, and Manipulate Objects by Mouse ( Moving, Selecting, Editing by using mouse), In this CATIA CAD courses, we will learn about TREE & COMPASS tool, Most of the "computer aided design program" contains Tree that explain the process sequence of drawing and design, CATIA Contains a powerful, easy, flexible, and distinctive tree, and contains the most strong tools that used to manipulate and move objects which is Compass.
Or, Put the cursor anywhere on the branch of the History Tree and click on Mouse Button 1

2 To show the first level of the Specification Tree, click on the View --->Tree Expansion ---> Expand First Level.
 3 To show the second level of the Specification Tree, click on the View --->Tree Expansion ---> Expand second Level.
1 Choose Edit ---> Scan or Define In Work Object.
2 To scan all steps, You can Choose ‘forward’ at each step.
- A brief introduction about Catia v5 Tree.
The Properties of the Tree
In this lesson we will learn about the properties of the tree for 3d modeling software (CATIA V5), and we will get familiar about their Specifications and attributes.
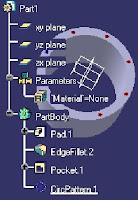
CATIA V5 provides us a general specification tree which allows use to view and edit elements and objects (sketches, features,... ) in a flexible manner. The hierarchy, is called the Specification Tree, and the tree structure is different with the type of document under the amendment.
1 Pad.1 (before).
2 Pocket.1.
3 Part Number.
To Show and Hide the Tree:
Press F3 key (Keyboard Shortcut) to hide or to show the Specification Tree, or from view list as shown in the figure below
To make tree Activate or Deactivate:
Press [shift] + F3 key (Keyboard Shortcut) to make Object or tree Activate or Deactivate
Transfer the Tree:
We can use the scrollbar to show the tree upward or downward, If the size of the tree override the window
1 To Show the head of the tree, Click up arrow.
2 You can Pull the bar up and down.
3 To Show the bottom of the tree, Click down arrow.
4 Put the cursor on a tree branch, note that the shape of the cursor is change to a pointing finger.
5 When you click on the MB1 the shape of the cursor is change to a small hand, then you can pull the mouse to transfer the tree.
3 To Show the bottom of the tree, Click down arrow.
4 Put the cursor on a tree branch, note that the shape of the cursor is change to a pointing finger.
5 When you click on the MB1 the shape of the cursor is change to a small hand, then you can pull the mouse to transfer the tree.
Zooming and Expanding the Tree:
1 Click on the MB1 (mouse button 1) on a tree branch.
2 While you pressing on the MB1, drag the mouse up and down to zoom in or zoom out.
3 Note that while zooming the tree, the Geometry dimmed, and to make the geometry active again click on a tree branch.Expand &Shrink:
Click on the [+] button to expand the tree, and click on the [-] button to shrink the tree. as shown in the figure:
Collapsing and Expanding the Tree:

 3 To show the second level of the Specification Tree, click on the View --->Tree Expansion ---> Expand second Level.
4 To collapse the tree, click on the Collapse ALL.
Scan the Design stages:
In the computer aided design program (CATIA V5) there is a powerful and effective tool to display the Part History step by step in order to seeing design process.1 Choose Edit ---> Scan or Define In Work Object.
2 To scan all steps, You can Choose ‘forward’ at each step.
Using the Compass to Moving Objects
In this part of CAD lessons we will learn how to benefit from the compass to dealing with objects.
Before you start make sure to activate the compass:
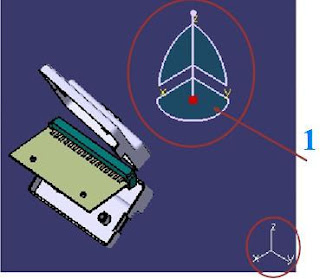
The compass in CATIA V5 is a powerful tool to manipulate and move objects, particularly in Free-Style, Assembly Design and Digital Mock-up products.
1 Featured plane (or Base of the compass), Default is XY plane.
Note that, The upper right corner of the screen is Default location of compass. and The reference axis system XYZ is parallel to the Default orientation of the compass.
When we use the compass?
- To rotate and transfer items in the Sketcher, parallel to the sketch level.
- To transfer elements and components in an assembly and in Digital Mock-up.
- To distortion surfaces as patches and identify cutting plane in Free-style.
- To Rotate Geometry in 3D way.
Using the Compass in Simple way:
Use the compass to make a rotation
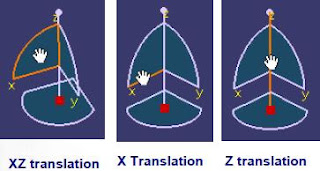
Use the compass to make a Translation
Drag and rotate about Z axis…
Note that, the default position and direction of the Part or element does not change.
To put the Compass at its default position and default orientation, we can either pull it and drop it onto the lower right corner (reference Axis System) or from the view menu click on the Reset Compass command (very helpful when the compass does not appear).
Put the Compass on the element:
The element moving related to the origin.
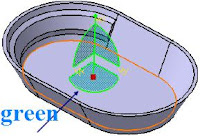
1 Put the cursor on the red square and click on it.
2 Then drag it to the element.
3 Then Drop the compass on the element, and note that the color of the compass will be green.
4 Choose the desired plane (or axis ) of the compass and pull it.
5 Result.
---------------------------------------------------------------------------
Here we come to the end of this computer aided design lesson, where we became familiar with the properties of the tree and the compass.
-Visit this lesson to learn more about Manipulate Objects using Mouse in the most powerful 3d modeling software CATIA V5.
- Go to this article to know more about CATIA V5 program and its Achievements over the world.
- A brief introduction about Catia v5 Compass.- A brief introduction about Catia v5 Tree.


Best CAD Center
ReplyDeleteAutoCAD Training Center
Top CAD Institute
CAD Training
CAD courses
Civil CAD Course
Awesome points there, much appreciated. And here is the relevant article, possibly somebody will discover it valuable as well Best 3d laser scanning services Vancouver, BC
ReplyDeleteThanks a lot very much for the high quality and results-oriented help. I won’t think twice to endorse your blog post to anybody who wants and needs support in this area. same as your blog i found another one Mobile Marketing .Actually I was looking for the same information on internet for Mobile Marketing and came across your blog. I am impressed by the information that you have on this blog. Thanks once more for all the details.
ReplyDeleteIntelliMindz is the best IT Training in Chennai with placement, offering 200 and more software courses with 100% Placement Assistance.
ReplyDeleteSalesforce Training In Chennai
Python Training In Chennai
Selenium Training In Chennai
Java Training In Chennai
Catia Training In Chennai
Ansys Training In Chennai
ReplyDeleteCatia Training Course in Gurgaon
youtube - vimeo.com/204889-9 - videodl.cc
ReplyDeleteVimeo - youtube converter YouTube - Vimeo.com - Video Gaming - Videodl.cc - Category: Video Gaming. vimeo.com - View video games, get in on the action, compete in tournaments,
Catia Training in Gurgaon
ReplyDelete